What is eBiomer?
eBiomer is a Java-based biomolecular modeling package. It is useful in generating initial structures of biopolymers and small organic molecules. Simple force-field energy minimizations can be carried out in addition to simulated annealing with molecular dynamics.
Download eBiomer executable jar here (need JRE 8.1): eBiomer.jar
Github Repository: https://github.com/NeillWhite/eBiomer
Contents
Features (v 1.3)
- Model builders for Proteins, Nucleic Acids, and Polysaccharides
- Reads and writes PDB files
- Interactive Molecular editor
- Implementation of the AMBER force field
- Geometry optimization with steepest descent and conjugate gradient methods
- Simulated Annealing with Molecular Dynamics
- Exports jpeg, gif, and ppm images
Quick Reference
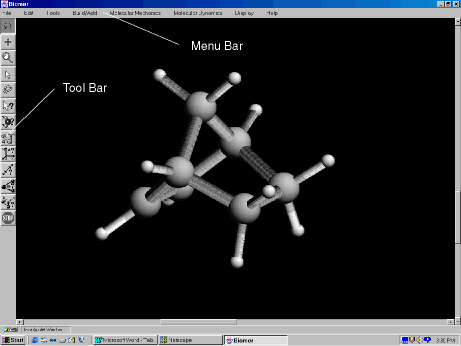
The Tool Bar and Menu Bar of eBiomer.
Menu Bar
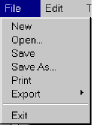
- File – The File Menu provides the following options:
- New : Erases and deletes the current molecule.
- Open : Opens a PDB file from the local hard drive.
- Save : Saves the molecule to the local hard drive in PDB format.
- Save As : Saves the molecule to the local hard drive in PDB format. Necessary if you wish to rename the molecule.
- Print : Prints the current image.
- Preferences : Triggers a dialog which allows for some user preferences to be set.
- Export : Writes the current images as a .jpeg, .gif, or .ppm file.
- Exit : Exits B.
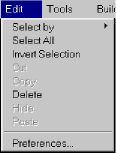
- Edit
- Select by : Use to mouse to select atoms, residues, strands, or the entire molecule.
- Select All : Select all the atoms in the molecule.
- Invert Selection : Causes unselected atoms to be selected and vice-versa.
- Cut : Deletes current selection and places the object in a buffer ( not yet functional ).
- Copy : Copies the current selection and places the object in a buffer ( not yet functional ).
- Delete : Deletes atom or bond ( depending on which is clicked on ).
- Hide : Prevents current selection from being displayed ( not yet functional ).
- Paste : Pastes object in buffer to clicked location on screen ( not yet functional ).
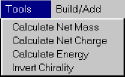
- Tools
- Calculate Net Mass : Returns the mass of the current molecule in amu.
- Calculate Net Charge : Returns the charge of the molecule in e.
- Calculate Energy : Performs a single-point calculation of the gradient and energy using AMBER.
- Invert Chirality : Reflects the molecule through the z-axis, giving the stereoisomer.
- Build/Add
- Show Periodic Table: Allows the default drawing element to be changed. Left-clicking on an element in the periodic table results in that element being illuminated in red. This is the new default drawing element. Now, all drawn atoms will be of this type ( until a new default element is selected ).
- Add Hydrogens : Adds hydrogens to carbon, nitrogen, and oxygen atoms.
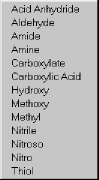
- Add Functional Group : Attaches a functional group to an existing molecule or places the fragment on the canvas.
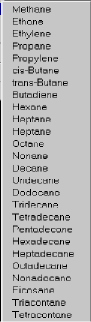
- Add Hydrocarbon : Attaches a hydrocarbon to an existing molecule or places the fragment on the canvas.
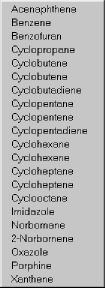
- Add Ring : Attaches a ring structure to an existing molecule or places the fragment on the canvas.
- Add Miscellaneous : Attaches miscellaneous a structure to an existing molecule or places the fragment on the canvas.
- Polynucleotide – Displays a dialog to construct a polynucleotide ( DNA or RNA ).
- Polypeptide – Displays a polypeptide dialog to construct polypeptides.
- Polysaccharide – Displays a polysaccharide dialog to construct polysaccharides.
- Molecular Mechanics
- Force Field – Select the potential energy function to use ( force field ). Currently, only AMBER is implemented.
- Minimizer – Choose either the conjgate gradient or steepest descent technique.
- Minimize – Optimize the geometry of the molecule.
- Molecular Dynamics
- Options – Set the options for the MD / simulated annealing run.
- Start Trajectory – Start the MD / simulated annealing run using the options above.
- Display
- Render – Choose several different graphics options.
- Depth Cueing – Toggle depth-cueing for the wireframe models.
- Shiny – Create a “shiny” effect on the spacefill, spheres, ball-and-stick, and polytube models.
- Help
- About – Information about B.
Tool Bar
Tool Bar objects are selected by left-clicking on the object.

Rotate – Once selected, rotates the molecule by holding the left mouse button down and dragging over the B screen area. Double-clicking reverts the molecule to its original orientation.

Translate – Once selected, translates the molecule by holding the left mouse button down and dragging over the B screen area. Double-clicking translates the molecule back to its original position ( usually centered ).

Zoom – Once selected, zooms the molecule in to the viewer by holding the left mouse button down and dragging the mouse to the right in the B screen area. The molecule is zoomed away from the viewer by dragging to the left. Double-clicking resets the zoom to its default value.

Selection Pointer – Once selected, left clicking on atoms results in those atoms being selected.

Selection Lasso – Left click and drag to select groups of atoms by enclosing them in a simple closed path.

Atom Label – Identify an atom by left clicking on it. The atom name is given first, followed by the atom number in parentheses, the AMBER atom type in brackets [], and the atomic charge in <>. For example, a hydrogen atom named H2 which is atom number 5 in the molecule, is AMBER atom type HO, and has charge 0.3e is displayed as H2(5)[HO]<0.3>.

Atom Labels – Labels all the atoms in the molecule using the format described above.

Build – Create new atoms and bonds clicking on this tool.
To create a new atom: Left-click in the B screen area. A new atom has been placed. You may wish to have the labels turned on, so that the atom is visible. The element is carbon, by default. The default element can be changed by selecting a new atom from Show Periodic Table.
To bond two atoms together: Left-click in the B screen area to place a new atom. Continue holding the left mouse button down while dragging to the atom to which you wish to make a bond.
To move an atom: Hold the middle-mouse button down and drag to the desired location.
To change the bond order: To change between single, double, and triple bonds, right-click on the bond, and the bond order will cycle between single, double, and triple bonds.
To change the atom type: To change the atom type, select a new atom from Show Periodic Table, and left-click on the atom to be replaced.

Coordinates – Once selected, left-clicking on an atom results in the x, y, and z coordinates of the atom to be displayed.

Distance – Once selected, left-clicking on two atoms results in the display of the distance between the atoms.

Angle – Display the angle between three atoms by left clicking on each ( in order ).

Torsion – Display the torsion between four atoms by left-clicking on each ( in order ).

Stop – Stops the current calculation ( not yet functional ).
Tutorial/Examples
Example 1: Building B-form DNA.
Example 2: Building a short polypeptide, bovine oxytocin.
Example 3: Sketching free-form molecules.
Example 1: Building B-form DNA.
The first example shows how to make a simple model of b-form DNA, with a
sense sequence of (gcgatta). From the Build/Add option of the Menu Bar, select
Polynucleotide ( Figure 1 ).

Figure 1a. Selecting Polynucleotide from the Menu Bar.
The polynucleotide dialog box appears. The dialog allows many options to be specified but for the purpose of this example, we will use the default options which result in b-form DNA. In the Add Base (Pair) section of the dialog, select in the following order:
G – (C)
C – (G)
G – (C)
A – (T)
T – (A)
T – (A)
A – (T)
5′-CAP
3′-CAP
You will see the sequence as it is being built in the box above the Help button. The above sequence of button clicks results in b(gcgatta). The 5′-CAP and 3′-CAP buttons serve to replace the sense and anti5′ terminal phosphates with hydrogens and adds hydrogens to both the sense and anti 3′ terminal oxygens.
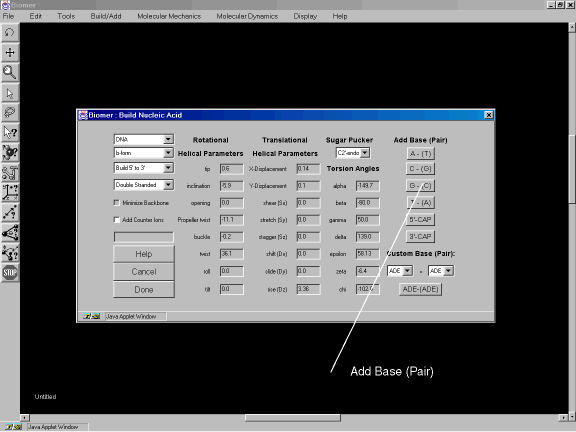
Figure 1b: Adding base-pairs to the polynucleotide.
After the sequence has been entered, click on Done. Then click on the rotate button from the Tool Bar (Figure 1c). Drag the mouse (while holding down the left mouse button) in the screen area to rotate the DNA into a satisfactory view.
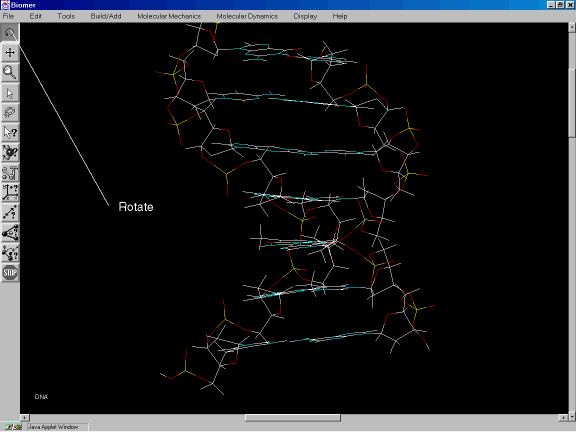
Figure 1c: Using the rotate button to orient the DNA.
Example 2: Building a short polypeptide, bovine oxytocin.
Bovine oxytocin is a short polypeptide hormone which contains a disulfide bridge. This nonapeptide has the sequence Cyx-Tyr-Ile-Gln-Asn-Cyx-Pro-Leu-Gly, where the Cyx cysteine residues at positions 1 and 6 are bonded via the S-S linkage. In this example, we model bovine oxytocin using the polypeptide model builder and perform geometry optimization.
From the Build/Add option of the Menu Bar, select Polypeptide ( Figure 2a ).
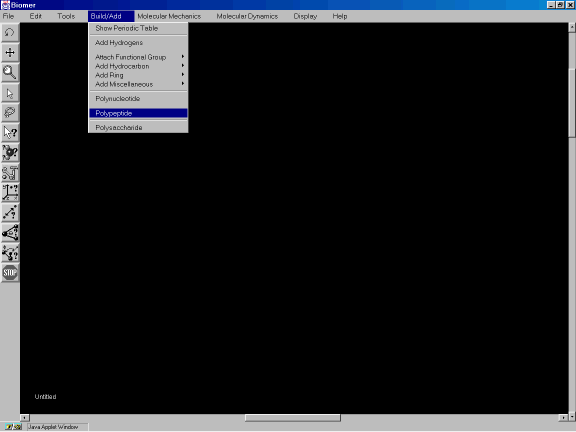
Figure 2a: Invoking the Polypeptide model builder.
Enter the sequence of the polypeptide by clicking on the residue buttons in the following order:
Cyx
Tyr
Ile
Gln
Asn
Cyx
Pro
Leu
Gly
The peptide will be build in an Extended conformation with all torsion angles set to 180 degrees (Figure 2b).
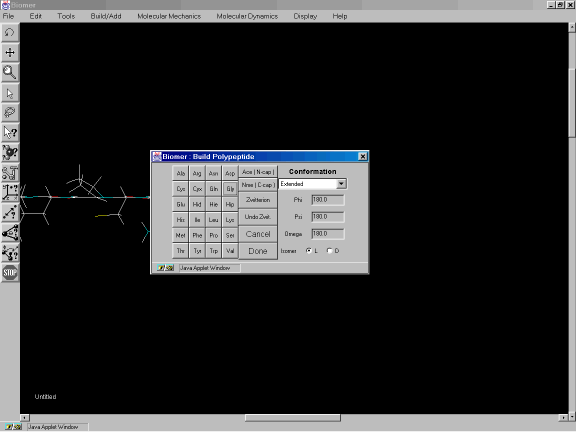
Figure 2b: Polypeptide dialog and construction of small peptide.
After the sequence has been entered, click on Done and use the rotate tool to position the polypeptide as shown in Figure 2c. After the peptide has been properly oriented, select the Build Tool (Figure 2c) to create the disulfide bridge. Using the left mouse button, click on the sulfur of the Cyx residue at position 6. While holding the mouse button down, drag over to the sulfur of the Cyx at position 1 and release the mouse button. A S-S bond should have been created as shown in Figure 2c.
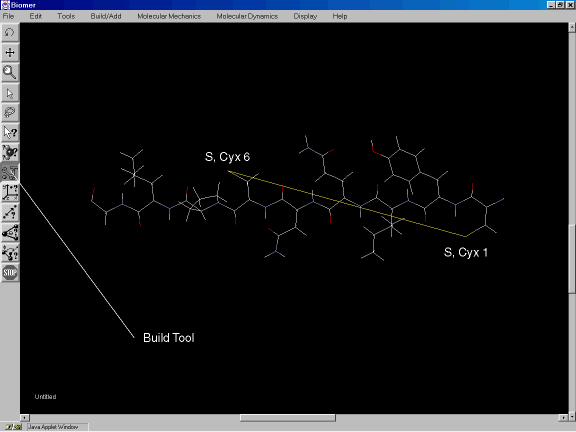
Figure 2c: Creating the disulfide bridge.
The S-S bond measures over 19 Angstroms long and so clearly this is not an optimum geometry. To minimize the energy of the structure, select Minimize from the Molecular Mechanics option of the Tool Bar. This will run 100 steps of steepest descent energy minimization.
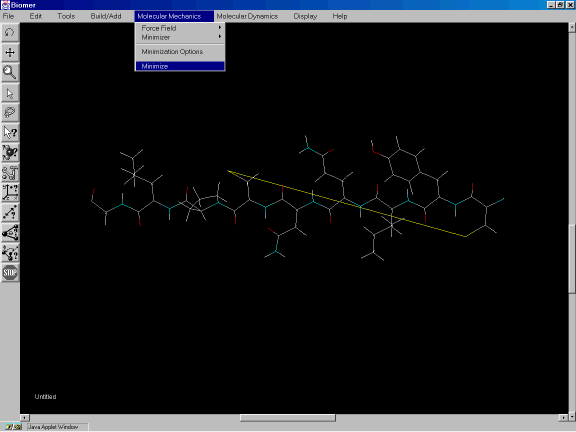
Figure 2d: Minimizing the energy of the molecule.
From the Molecular Mechanics option of the Menu Bar, select Minimization Options. For the Conjugate Gradient Algorithm (Figure 2e), select Fletcher-Reeves. Set the Maximum Iterations to 500 and click on Done. From the Molecular Mechanics option, select Minimize.
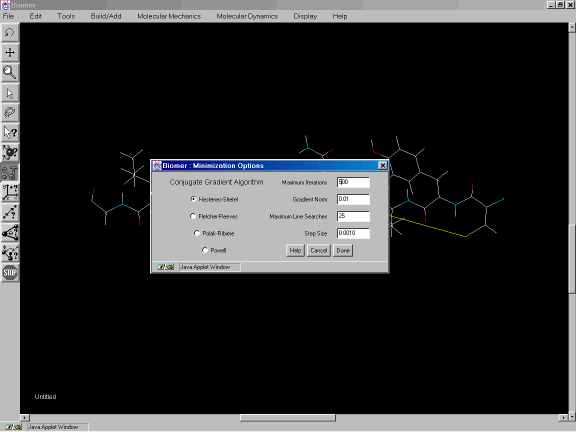
Figure 2e: Minimization Options dialog.
To allow the system to overcome any potential energy barriers, we will conduct a short simulated annealing run. From the Molecular Dynamics option of the Menu Bar, select Options. Change the Cool Time to be 5 picoseconds (ps) and click on Done. Now click on Start Trajectory under Molecular Dynamics.
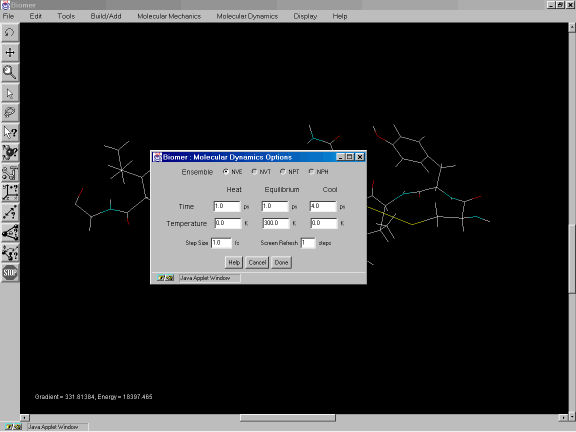
Figure 2f: Molecular Dynamics Options dialog.
After the simulated annealing run is complete, minimize the energy once again by clicking on Minimize under Molecular Mechanics. The resulting structure, shown in Figure 2g, shows a more plausible cyclic peptide, with an S-S bond length of 2.05 Angstroms.
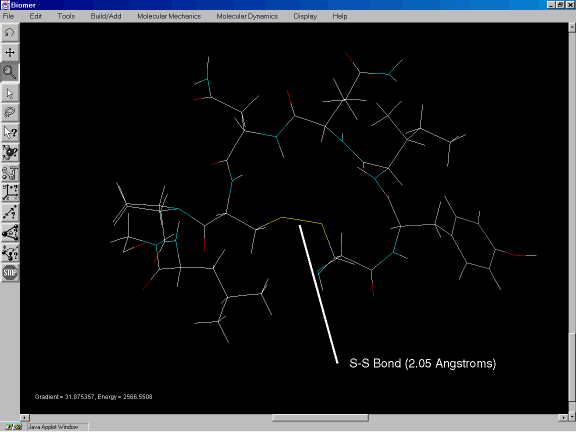
Figure 2g: Minimized structure of bovine oxytocin.
Example 3: Sketching free-form molecules.
This example illustrates how the use the Build Tool to sketch molecules in the B window. First, from the Build/Add option of the Menu Bar, select Show Periodic Table. A periodic table should appear (Figure 3a). The default drawing element is carbon.
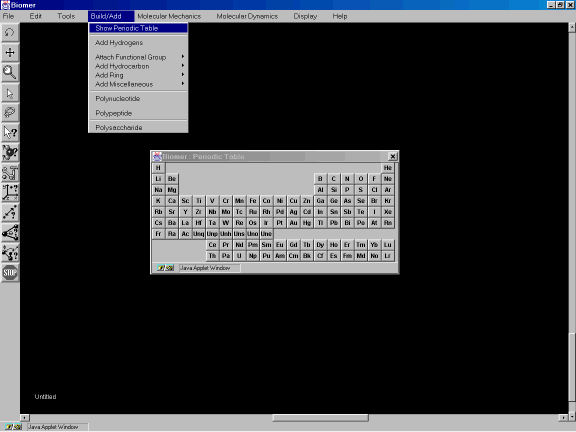
Figure 3a: The Periodic Table dialog.
Select the Atom Labels and Build Tool buttons on the Tool Bar (Figure 3b).
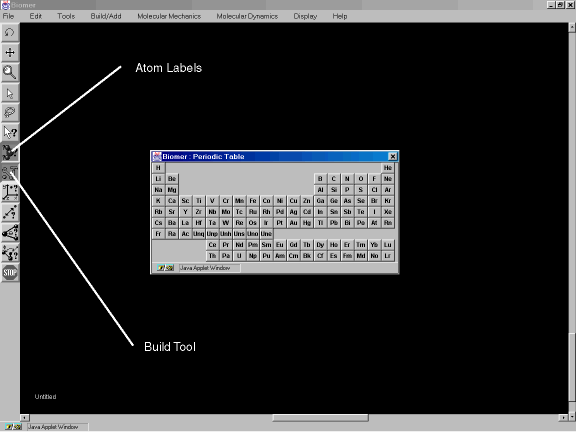
Figure 3b: The Build Tool and Atom Labels tools.
Position the mouse on the screen and while pressing the left mouse button down, drag the mouse to the lower right to create a bond as shown in Figure 3c.

Figure 3c: Creating a bond.
After releasing the mouse button, hold it down again and drag the mouse up to the upper right to create a third atom. Repeat the process and drag to the lower right so you have the same molecule as shown in Figure 3d.
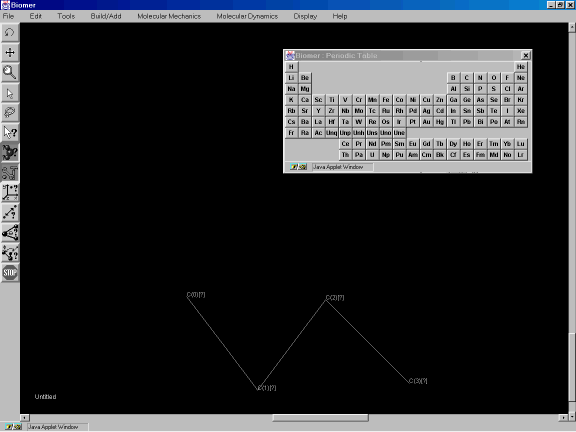
Figure 3d: Using the Build tool.
Now, change the alkane to an ester by changing the default drawing element to oxygen. The default drawing element will be red. Click on the Oxygen atom in the periodic table. Now click on atom C2 (Figure 3e) to change it from a carbon to an oxygen.
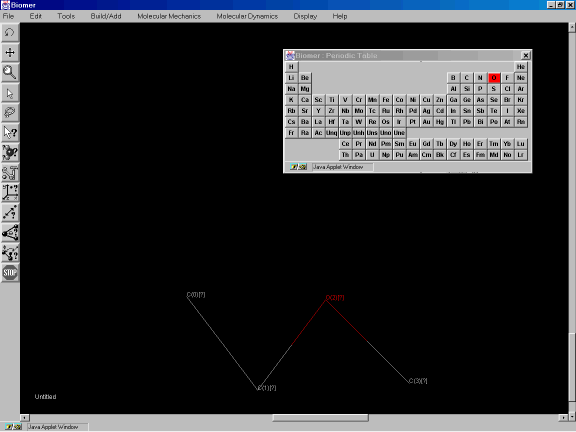
Figure 3e: Changing the element type of an atom.
Now add a ring to this structure. Close the Periodic Table dialog and from the Build/Add option of the Menu Bar, select Add Ring and Cyclohexane. After the message Click to place Cyclohexane appears, click on atom C0 to add a bond from this atom to a cyclohexane ring (Figures 3f,3g).
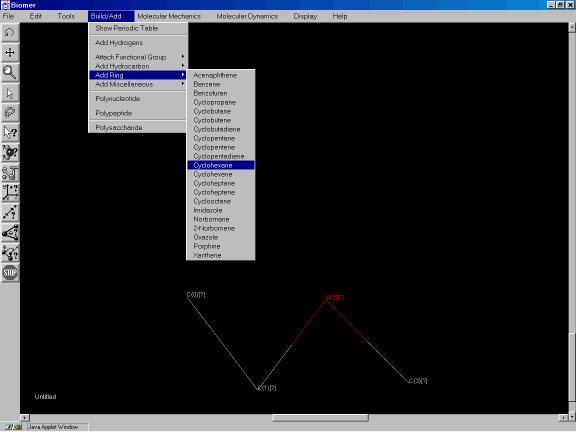
Figure 3f: Adding cyclohexane to the sketched molecule.
Now add hydrogens by selecting Add Hydrogens from the Build/Add pulldown menu option (Figure 3g).
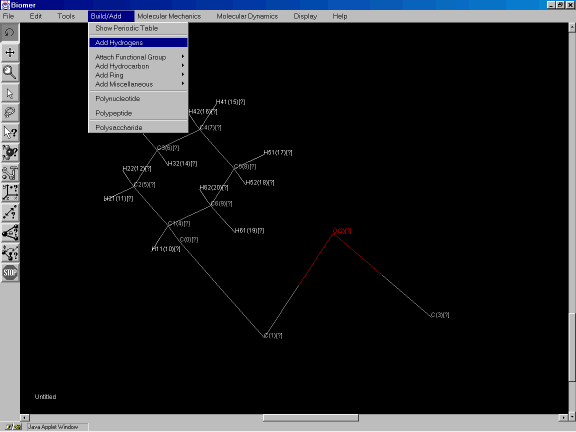
Figure 3g: Adding hydrogens to the molecule.
Now select Minimize from the Molecular Mechanics option to optimize the geometry of the structure (Figure 3h) using the steepest descent algorithm.
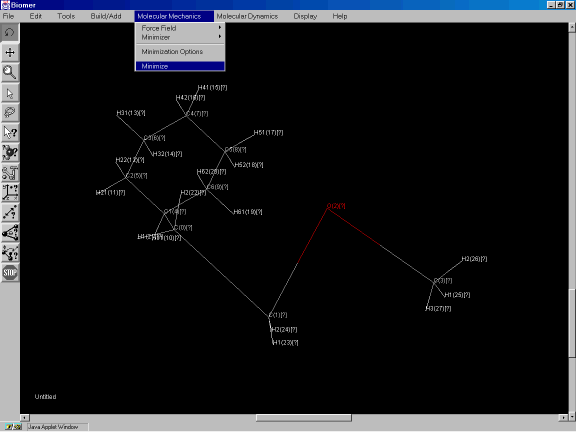
Figure 3h: Minimizing the structure of the molecule.
After the geometry optimization, the molecule should look similar to the one shown in Figure 3i.
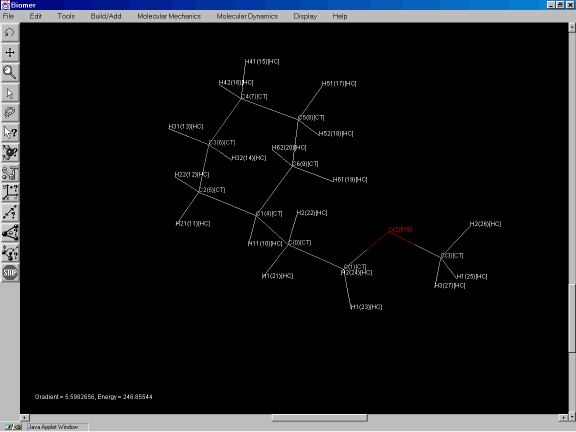
Figure 3i: Minimized structure of the molecule.
To change the rendering from wireframe to a spacefilling CPK model, from the Display option of the Menu Bar, select Render and Spacefill (Figure 3j).
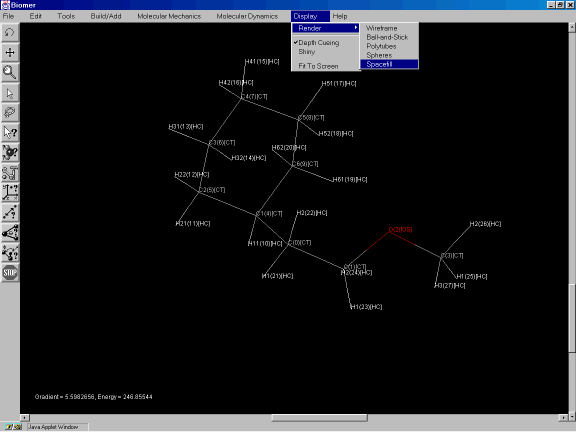
Figure 3j: Changing the rendering to a spacefilling CPK model.
The model should look similar to the one shown in Figure 3k.
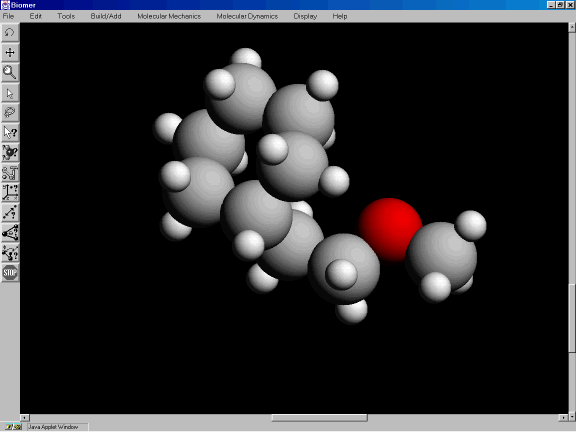
Figure 3k: Spacefilling CPK model.
Now, save the molecule as a PDB file. From the File option, click on Save (Figure 3l).
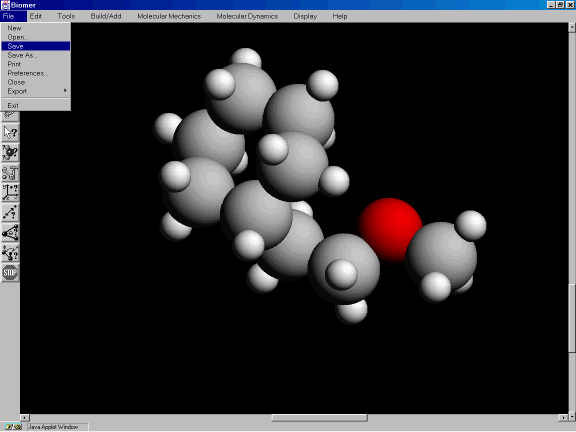
Figure 3l: Saving the molecule as a PDB file.
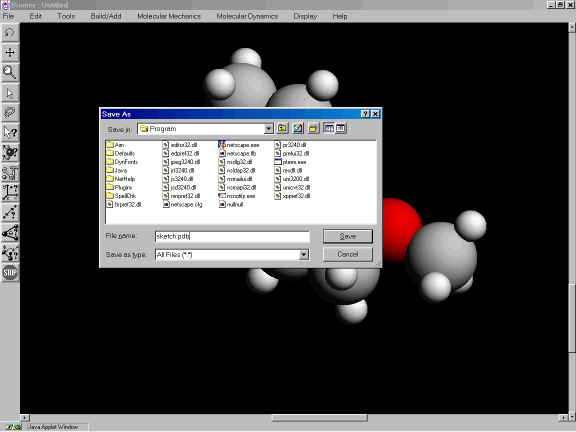
Figure 3n: File dialog.
Screenshots
Figure 1. CPK model of small molecule.

Figure 2. Modeling porphine.
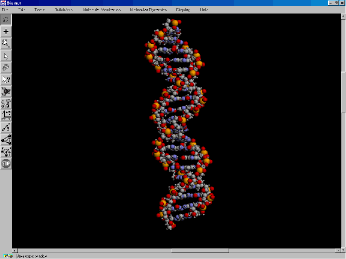
Figure 3. Spacefilling model of B-form DNA.
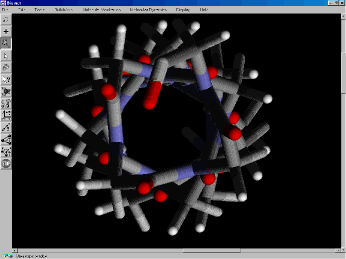
Figure 4. View down the center of a poly-glycine alpha helix.
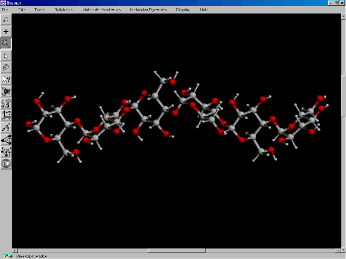
Figure 5. Construction of a small polysaccharide
Help
Click on the area of the screen where you need help.
Menu Bar
- File
 – The File Menu provides the following options:
- New : Erases and deletes the current molecule.
- Open : Opens a PDB file from the local hard drive.
- Save : Saves the molecule to the local hard drive in PDB format.
- Save As : Saves the molecule to the local hard drive in PDB format. Necessary if you wish to rename the molecule.
- Print : Prints the current image.
- Export : Writes the current images as a .jpeg, .gif, or .ppm file.
- Exit : Exits B.
- Edit
- Select by:
 Use to mouse to select atoms, residues, strands, or the entire molecule.
 - Select All: Select all the atoms in the molecule.
- Invert Selection: Causes unselected atoms to be selected and vice-versa.
- Cut: Deletes current selection and places the object in a buffer ( not yet functional ).
- Copy: Copies the current selection and places the object in a buffer ( not yet functional ).
- Delete: Deletes atom or bond ( depending on which is clicked on ).
- Hide: Prevents current selection from being displayed ( not yet functional ).
- Paste: Pastes object in buffer to clicked location on screen ( not yet functional ).
- Preferences :
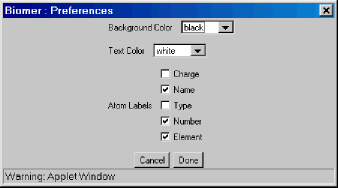 Triggers a dialog which allows for some user preferences to be set.
- Select by:
- Tools
- Calculate Net Mass : Returns the mass of the current molecule in amu.
- Calculate Net Charge : Returns the charge of the molecule in e.
- Calculate Energy : Performs a single-point calculation of the gradient and energy using AMBER.
- Invert Chirality : Reflects the molecule through the z-axis, giving the stereoisomer.
- Build/Add

- Show Periodic Table:
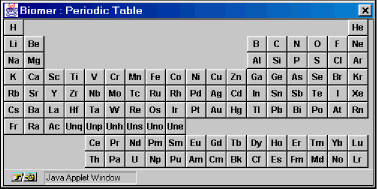 Allows the default drawing element to be changed. Left-clicking on an element in the periodic table results in that element being illuminated in red. This is the new default drawing element. Now, all drawn atoms will be of this type ( until a new default element is selected ). Note that the default drawing element persists after the Periodic Table dialog has been dismissed.
 - Add Hydrogens : Adds hydrogens to carbon, nitrogen, and oxygen atoms.
- Attach Functional Group :
 Attaches a functional group to an existing molecule or places the fragment on the canvas.
 - Add Hydrocarbon :
 Attaches a hydrocarbon to an existing molecule or places the fragment on the canvas.
 - Add Ring :
 Attaches a ring structure to an existing molecule or places the fragment on the canvas.
 - Add Miscellaneous :
 Attaches miscellaneous a structure to an existing molecule or places the fragment on the canvas.
 - Polynucleotide – Displays a dialog to construct a polynucleotide ( DNA or RNA ).
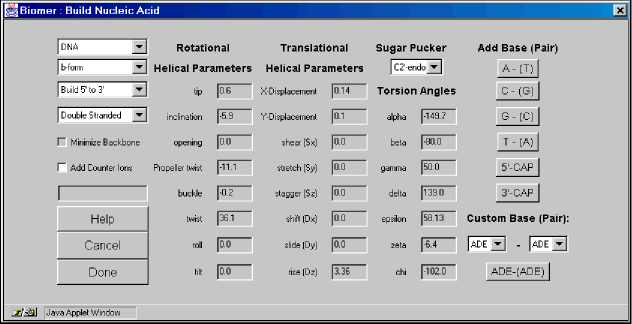 The first pulldown menu in the Build Nucleic Acid dialog offers a choice of building either DNA or RNA. The second pulldown menu provides some standard forms of both DNA and RNA. The standard RNA forms are a-form and a’-form and the standard DNA forms are a-form, a’form, b-form, c-form, c’-form, d-form, e-form, t-form, z-form, and custom. The forms differ in the rotational and translational helical parameters. By selecting Custom, the Rotational and Translational Helical Parameters and Torsion Angle textfields become active. That is, you can specify your own parameters. For the torsion angle parameters, only the alpha, epsilon, and zeta textfields remain inactive. This is because modifying these torsion angles would require modifying atomic positions on neighboring residues, which in turn, would effect the rotational and translational parameters of that residue. The third and fourth pulldown menus offer options to build the chain in the 5′ to 3′ direction (common) or the 3′ to 5′ direction and whether to build the chain single- or double- stranded. The choice of Single Stranded or Double Stranded can be changed in the middle of creating a chain so that there can be regions of double-stranded and single-stranded helices in the same molecule. The Minimize Backbone option optimizes the geometry of the sugar-phosphate backbone after each basepair is added. (not yet functional).The Add Counter Ions checkbox addes sodium counter ions to the highly charged phosphate groups.The sequence field displays the sequence as it has been entered.The Rotational and Translational Helical Parameters are described in Definitions and Nomenclature of Nucleic Acid Structure Parameters, J. Mol. Biol., 205, 1989, p. 787-791, by S. Diekman.The Sugar Pucker option describes the conformation of the furanose five membered ring. The Torsion Angles section describes the backbone torsion angles on the sense side of the helix. Note that the torsion angles may not be the canonical torsion angles for the different forms reported in the literature. This is due to the fact that the individual nucleotide residues are placed according to their translational and rotational parameters – which may not result in the correct backbone torsion angles. The Torsion Angles section offers a possibility to correct for these errors. For more information about the parameters, see Principles of Nucleic Acid Structure, by Wolfram Saenger, Springer-Verlag, 1984.The Add Base (Pair) section lists the different base (pairs) that can be added. The addition can only be a single base and need not be a base pair if the Single Stranded option is set. For instance, the A – (T) button adds an adenosine nucleotide if Single Stranded is set and an adenosine Watson-Crick paired to a Thymidine if Double Stranded is set. The 5′-CAP and 3′-CAP buttons cap the helix by replacing the sense and anti terminal phosphates with hydrogens and adding hydrogens to both the sense and anti terminal O3′ oxygens.The Custom Base (Pair) option allows for unusual, or minor base pairs to be created. Note that there is no attempt to rationalize the geometry of these base pairs. They are simply placed in an orientation where they would participate in a normal Watson-Crick base pair by using the specified translational and helical parameters.
 - Polypeptide – Displays a polypeptide dialog to construct polypeptides.
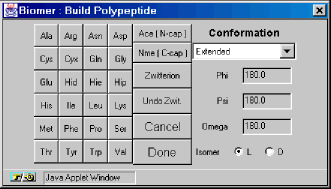 The twenty amino acids are as listed:
- Ala – Alanine
- Arg – Arginine
- Asn – Asparagine
- Cys – Cysteine
- Cyx – half a Cysteine (for cross-linking)
- Gln – Glutamine
- Glu – Glutamic Acid
- Gly – Glycine
- Hid – Histidine (neutral, hydrogen in delta position)
- Hie – Histidine (neutral, hydrogen in epsilon position)
- Hip, His – Histidine (positively charged, hydrogen in delta and epsilon positions)
- Ile – Isoleucine
- Leu – Leucine
- Lys – Lysine
- Met – Methionine
- Phe – Phenylalanine
- Pro – Proline
- Ser – Serine
- Thr – Threonine
- Tyr – Tyrosine
- Trp – Trptophan
- Val – Valineand
- Ace – Acetyl, N-terminal residue
- Nme – N-Methyl amino C-terminal residue
The last two residues are terminating residues and can only be used once in a polypeptide. The Ace residue can only be added as the first residue in the sequence. Once the Nme residue is added, no other residues can be added to the chain.The Zwitterion button changes the peptide so that the N- and C- terminal ends are zwitterionic, with NH3+ and COO- terminal groups. This button can be pressed at any stage of the polypeptide construction process.The Undo Zwit. button changes the peptide from zwitterionic to non-zwitterionic. The Conformation section describes the structural motif arising from the Phi, Psi, and Omega torsion angles. The background color of the pulldown menu can be either white or light gray. If the background it white, then the structural motif shown previous built has been completed. If the background is light gray, then the motif is in progress. For instance, a Beta 5 turn consists of four sets of torsion angles – that is a Beta 5 turn takes 4 residues to complete. When the Beta 5 turn is complete, the background turns white indicating that it is okay to change to another motif. Selecting “Other” from the conformation menu activates the Phi, Psi, and Omega textfields so that these torsion angles can be explicitly defined.The Isomer checkbox enables one to build both L- and D- type peptides.
- Polysaccharide – Displays a polysaccharide dialog to construct polysaccharides.
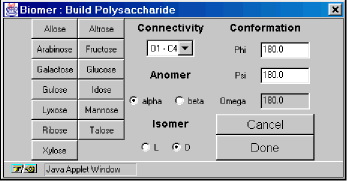 There are 13 monosaccharide monomers to choose from, including 8 hexoses and 5 pentoses:
Monosaccharide
5 or 6 membered ring
Allose
6
Altrose
6
Arabinose
5
Fructose
5
Galactose
6
Glucose
6
Gulose
6
Idose
6
Lyxose
5
Mannose
6
Ribose
5
Talose
6
Xylose
5
The Connectivity selection indicates how the previous monosaccharide is to be connected to the new monosaccharide. The available options are O1 (from the previous monosaccharide) to C1of the new monosaccharide (O1-C1), O1-C2, O1-C3, O1-C4, O1-C5, and O1-C6. Some options may not be available depending on whether you are using a 5- or 6- membered ring.The Anomer choice indicates the nature of the O1-CX connection – in the alpha or beta position.The Isomer choice allows for L- and D- type sugars.The Conformation section enables explicit definition of the relevant torsion angles. The Omega textfield becomes active when an O1-C6 bond is present.
- Molecular Mechanics
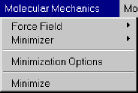
- Force Field – Select the potential energy function to use ( force field ). Currently, only AMBER is implemented.
- Minimizer – Choose either the conjgate gradient or steepest descent technique.
- Minimization Options
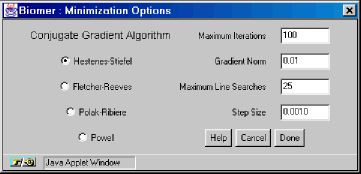 The Minimization Options dialog contains four different variants of the Conjugate Gradient Algorithm, and four other user settings. The Maximum Iterations textfield is the (integral) number of iterations the minimizer should perform before stopping. The Gradient Norm is the threshold gradient where the minimization is complete if gradient becomes less than this number. The Maximum Line Searches is applicable for the conjugate gradient methods and specifies how many times to look for a minimum in the direction of the negative gradient. The Step Size is the initial step size to use (the initial step in the direction of the negative gradient).
 - Minimize – Optimize the geometry of the molecule.
- Molecular Dynamics
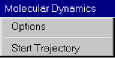
- Options – Set the options for the MD / simulated annealing run.
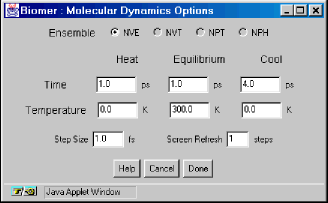 The Molecular Dynamics Options dialog allows the user to specify the length and structure of a simulated annealing run with molecular dynamics. All times are in picoseconds (ps) except for the Step Size, which is 1 femtosecond. The Screen Refresh textfield enables the screen to be updated infrequently, allowing the calculating to run faster.
 - Start Trajectory – Start the MD / simulated annealing run using the options above.
- Options – Set the options for the MD / simulated annealing run.
- Display
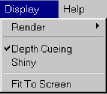
- Render – Choose several different graphics options.

- Depth Cueing – Toggle depth-cueing for the wireframe models.
- Shiny – Create a “shiny” effect on the spacefill, spheres, ball-and-stick, and polytube models.
- Render – Choose several different graphics options.
- Help
- About – Information about eBiomer.
Status Text
The status text in the lower left hand corner reports the name of the current file, or “untitled” if the molecule has not been saved. Results of calculations and measurements also appear here.
- Show Periodic Table: